How to create a vpn/ssh tunnel
FOR MAC:
Go to the app store and search for “ssh tunnel manager”
Download this free app.
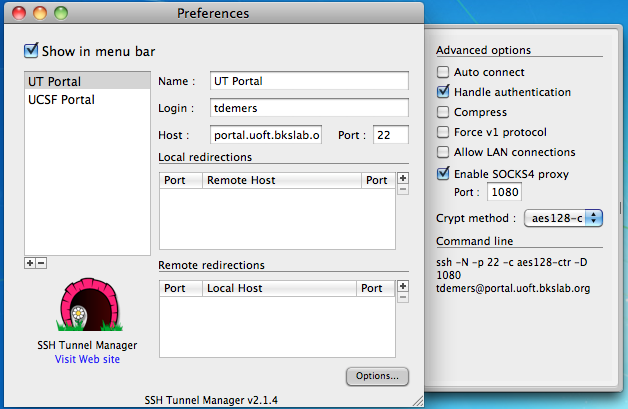
Click the “Show in menu bar” button on the upper lefthand corner.
Open it and then click the little ‘+’ sign on the bottom part of the white box.
Enter the following information:
For the Name field, name it whatever you want.
Login: your_user_name
Host: portal.uoft.bkslab.org
Port: ssh_port
Then click on the Options button in the bottom righthand corner.
Make sure “Handle authentication” is checked and check the “Enable SOCKS4 proxy”.
Make sure the port is 1080 (or something above port 1024).
Your screen should look like this:
Then close the SSH Tunnel Manager.
Go to System Preferences -> Network
Click on the connection you are connected to (ie Airport, Ethernet, etc).
Then click on Advanced in the bottom right corner.
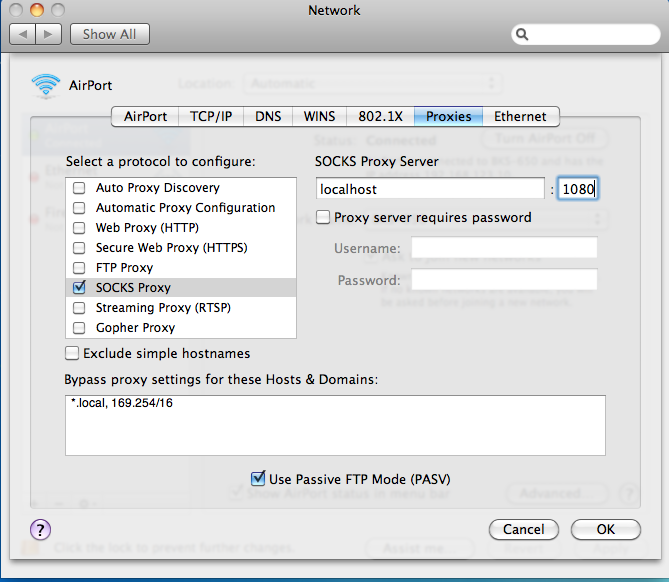
Then click on Proxies up in the top right of the box.
Then check SOCKS Proxy
Then under “SOCKS PROXY SERVER” enter localhost and to the right 1080 (or whatever port you decided to use previously).
It should look like this:
Click OK, then apply.
Then go to the ssh Tunnel Manger and click the “play”button on the right hand side:
It should say connected and possibly prompt you for your password (the one associated with your ssh key).
To test if your tunnel is good, go to: http://whatismyipaddress.com/
This will tell you what ip address you have. If it says 142.150.250.15, you are good to go! :)
Your computer will now act as if you were connected to the internet in the lab.
When you’re done with the vpn session click on the ssh Tunnel Manager and click the “stop” button.
Then go to System Preferences -> Network -> Advanced -> Proxies
and uncheck the SOCKS Proxy, click OK, then apply.
That’s it!

