AWS:Submit docking job
Part 2 of 3 of the AWS docking tutorial
Previous tutorial: AWS DOCK Environment Setup
Next Tutorial: Docking Analysis On AWS
Prerequisites
- You've followed the tutorial for setting up the environment: AWS DOCK Environment Setup
- Following from the previous requirement, you have the aws-setup docker image installed on your machine (we will continue using it in this tutorial)
- Likewise, you will need to know your AWS access key, secret key, etc.
How to copy data to Amazon S3
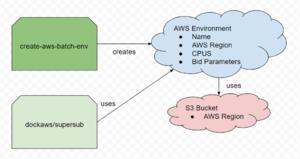
In the previous tutorial, you created an S3 bucket to set up your environment. S3 buckets act like virtual hard drives, with familiar operations like cp, ls, rm, and mv for storing & manipulating data.
In an AWS docking environment, S3 buckets are responsible for storing dockfiles, input, and output for docking runs. Typically, docking input is sourced from our lab's zinc3d bucket, which houses an enormous amount of db2 data for large docking screens, while dockfiles, output, and other configuration are saved to an environment-specific bucket. For custom screens, like DUDE-Z, input can be uploaded to & sourced from the environment-specific bucket instead.
You can take one of two approaches to get your data into an S3 bucket; the first is less complicated and more intuitive, the second is more complicated but opens more avenues for automation.
Approach 1: Use the browser console
AWS allows uploading files to S3 directly from the browser. Navigate to the S3 console (https://s3.console.aws.amazon.com/s3), where there should be a list of all buckets that your account owns.
Click on the bucket you'd like to upload to, and navigate to the folder within that bucket you want to upload to. You can upload folders and files as you wish through the interface.
You can click "Copy S3 Uri" in the top right of the interface to copy the full path of the directory or file you are viewing.
Approach 2: AWS CLI
The AWS CLI provides an interface to perform any conceivable operation on AWS resources, including S3 buckets.
The CLI is available on the command line within the aws-setup image, but you may find it more convenient to install the command-line CLI locally to your machine, such that all your files etc are visible. Here is the amazon tutorial on how to install the CLI: https://docs.aws.amazon.com/cli/latest/userguide/getting-started-install.html
For example, the CLI command to copy one file from your local drive into an S3 bucket looks like this:
aws s3 cp myfile.txt s3://mybucket/mydir/myfile.txt
Note that myfile.txt was saved under mydir/myfile.txt on the S3 bucket. Directories are created implicitly in S3, meaning it is not necessary to "mkdir" to create a directory, simply including the directory in the file's path is enough.
For a practical example, say you want to copy your dockfiles to S3. Here's what that looks like:
aws s3 cp --recursive docking_params/5HT2A/dockfiles s3://mybucket/docking_runs/5HT2A/dockfiles
The --recursive argument behaves similarly to "cp -r", allowing you to upload the directory's contents with one command.
If you've been using the aws-setup container to access the AWS CLI, you may be wondering how to find your dockfiles, as your system's usual files are not visible from within the container.
You can link files on your system to the container using docker's "-v" argument. For example, say all your various docking parameters are located under /home/myuser/dockingstuff on your system, and you'd like them to be visible within the aws-setup container somewhere.
docker run --rm -it -v /var/run/docker.sock:/var/run/docker.sock -v /home/myuser/dockingstuff:/tmp/dockingstuff btingle/aws-setup:latest
That extra "-v" argument tells docker to make all files under /home/myuser/dockingstuff on your host system visible in the container under the /tmp/dockingstuff directory. Once we've entered the container, we can verify this is true by ls-ing the /tmp/dockingstuff directory:
root@65aa6738db54:/home/awsuser# ls /tmp/dockingstuff
5HT2A    something_else    README.txt    docking_is_cool.smi
Note- if you're a Mac user, there may be some pain with permissions during this step. Your Mac will want you to provide explicit permissions for docker to access the linked directory, here's the docker tutorial on how to fix this: https://docs.docker.com/desktop/mac/#file-sharing.
Quickstart- Submitting docking jobs through AWS
Prerequisites
Upload Dockfiles
Using your preferred method, upload your dockfiles to S3. Make sure to copy the S3 URI for your dockfiles folder, it will be used during submission. INDOCK configuration is expected to be located within the dockfiles folder.
Upload Input List
The input list may need some explanation. This input list is expected to be a text file containing a list of S3 paths to dockable db2.tgz files accessible by the environment you are submitting to. For example, here is a short but valid input list:
s3://zinc3d/zinc-22x/H17/H17P200/a/H17P200-N-xaa.db2.tgz
s3://zinc3d/zinc-22x/H17/H17P200/a/H17P200-Q-xaa.db2.tgz
s3://zinc3d/zinc-22x/H17/H17P200/a/H17P200-N-xab.db2.tgz
If this is your first time running docking jobs, you can use this example list to test out your environment.
If you would like to create your own list, it is possible to select molecules to DOCK through our tranches viewer, available on cartblanche: https://cartblanche22.docking.org/tranches/3d. Use the interface to select molecules based on heavy atoms, charge, and logP. Once your selection is ready, click the download button in the top right to open the download menu. Under "method", select "DOCK37 (*.db2.tgz)" and "AWS S3" then confirm the download. This file can be used as an input list.
Once your input list has been prepared, upload it to S3 using your preferred method. Make sure to copy the S3 URI for your input list file, it will be used during submission.
Note for first-time runs
Prior to submitting a large docking campaign, it is wise to prepare a smaller run first, to check that the configuration etc. are working properly. You don't want to spend oodles of money on a docking campaign that didn't produce anything due to a broken configuration.
Quick Start
This step takes place in the aws-setup container. Run aws configure on startup as per usual. If you'd like to avoid running configure on start-up every time, see the "auto aws configure" subsection at the bottom.
Run supersub.bash without any arguments
cd /home/awsuser/awsdock/submit
bash supersub.bash
You'll be greeted by a prompt to enter the full name (or identifier) of your desired environment. If you just ran through the quickstart guide your environment will be named "dockenv-us-east-1".
[ What is the full name ($name-$region) of the environment to submit to? ]: dockenv-us-east-1
Next, it will ask you to provide an S3 location to send output to. This should be an S3 URL to a folder in your environment-specific bucket; don't worry about creating the folder if it doesn't exist, it will be created automatically.
[ Which s3 location should output be sent to? ]: s3://mybucket/some/output/directory
Enter a name for your job. Whatever you want it to be, just make sure it doesn't collide with the name of any other job in your S3 output folder.
[ What is the name for this batch job? ]: testjob
Now provide the dockfiles URL and input list URL you prepared beforehand:
[ Provide a location in s3 for the dockfiles being used for this run ]: s3://mybucket/stuff/dockfiles
[ Provide an s3 file location for the list of files to be evaluated by this run ]: s3://mybucket/stuff/input_list.txt
Think over your life decisions real quick and enter y to submit the job!
created 1 jobs for this batch, submit? [y/N]:
Alternative DOCK Executable
Do you have an experimental/specially tuned dock executable you'd like to use in lieu of the default? All you need to do is upload the DOCK executable to S3, and prior to running supersub.bash, export the following:
$ export S3_DOCKEXEC_LOCATION=s3://mybucket/dock_alternatives/special1/dock64
$ bash supersub.bash
Submission Configuration
The supersub.bash script can be automated through configuration files, similar to create-aws-batch-env.bash- see "configs/exconfig.config" next to supersub.bash for an example of what a complete configuration looks like.
auto aws configure
Create a file with your aws credentials like so:
### aws_config.txt
AWS_ACCESS_KEY_ID=<your AWS access key>
AWS_SECRET_ACCESS_KEY=<your AWS secret key>
AWS_REGION=<desired aws region code>
Add this file to your "docker run" command with the --env-file option, like so:
docker run --rm -it -v /var/run/docker.sock:/var/run/docker.sock --env-file aws_config.txt btingle/aws-setup
Monitoring Jobs
To see the status of your jobs, it is easiest to log on to the AWS Batch Console. https://console.aws.amazon.com/batch/home
Make sure to set your region in the console to the region your DOCK environment is located.
On your dashboard, you should see an overview of the status of your jobs.
- Jobs stuck in "Pending" for too long indicate that your environment has not been set up correctly and is missing a key component. Otherwise this indicates your jobs are waiting for resources.
- Jobs in "Runnable" have no outstanding issues and are ready to run, but will only run when compute resources are available. If your jobs are stuck here for a while, you may want to review your resource limits and make sure you can actually allocate the number of machines you've requested.
- Jobs in "Starting" are initializing on a real machine
- Jobs in "Running" are running on a real machine
- Jobs in "Succeeded" have finished successfully
- Jobs in "Failed" have failed
Your jobs may be stuck in the "Runnable" status for a while. Typically these jobs will go through in a couple days (and when they start to go through, they won't stop until they're all done), though there are cases where they can be stuck in this status indefinitely. The reasons for why this might be are myriad, and you're probably best off contacting me for help (ben@tingle.org). If you want to try and figure it out on your own, see this AWS help page: https://docs.aws.amazon.com/batch/latest/userguide/troubleshooting.html#job_stuck_in_runnable.
For more information on Job Statuses and what they mean, see this page: https://docs.aws.amazon.com/batch/latest/userguide/job_states.html
Resource Limits
Unfortunately, it is not possible to allocate thousands of machines for large scale docking right off the bat. Amazon imposes restrictions on your usage, especially if your account is new.
Viewing your current resource limits
Navigate to the EC2 console: console.aws.amazon.com/ec2
In the left sidebar, click on the "Limits" tab, just above the "instances" category. In the search bar, type "Spot", and look at your results.
The entry titled "All Standard (A, C, D, H, I, M, R, T, Z) Spot Insta..." shows how many CPUs you can utilize at one time. You should modify your compute environment's MAX_VCPUs configuration to match this number.
It may be disappointing to learn that you cannot maximize your LSD calculations off the bat, but the limits are in place so that you do not hurt yourself (financially) before being experienced with using AWS.
Requesting resource limit increases
In the limits menu, you can select the "All Standard (..." entry and click "Request limit increase" in the top right. In this new menu, select the region(s) you would like to increase your limit for and write a short paragraph explaining why you would like your limit to be increased. It does not hurt to set your requested limit to a reasonably high number, e.g 5000. More than likely you will not achieve this limit on your first increase, but if you shoot for the moon and miss, at least you will land among the stars, right?
Every billing cycle you can request AWS to increase your spot instance limit some more. This may take some time, but just make sure to explain your use case in the form and they will be more than happy to oblige.


