DOCK Blaster:Tutorials: Difference between revisions
Jump to navigation
Jump to search
No edit summary |
No edit summary |
||
| Line 2: | Line 2: | ||
== 1. DOCK MTX to DHFR (example of cofactor) == | == 1. DOCK MTX to DHFR (example of cofactor) == | ||
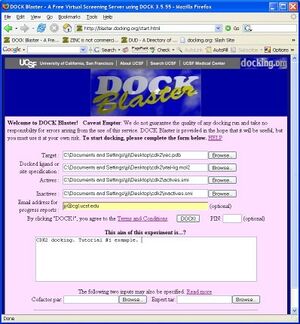
** 1. Go to DOCK Blaster web page [http://blaster.docking.org blaster.docking.org]. Please note that during pre-alpha testing this page is different. Contact [[John Irwin]] for details. | ** 1. Go to DOCK Blaster web page [http://blaster.docking.org blaster.docking.org]. Please note that during pre-alpha testing this page is different. Contact [[John Irwin]] for details. [[Image:Tut1-1.jpg|thumb|right|Figure Tut1-1]] | ||
** 2. Click on "Start docking!" to go to the input preparation page. | ** 2. Click on "Start docking!" to go to the input preparation page. | ||
** 3. Click on "HELP" to open up the documentation for input preparation in a separate window. | ** 3. Click on "HELP" to open up the documentation for input preparation in a separate window. | ||
*** 3.1. In the documentation window, click on "Sample Data" at the end of the first paragraph. | *** 3.1. In the documentation window, click on "Sample Data" at the end of the first paragraph. | ||
*** 3.2 In the sample data window, click on the link to data.docking.org | *** 3.2 In the sample data window, click on the link to data.docking.org | ||
| Line 13: | Line 13: | ||
** 4. Click on the first "Browse" button (to the right of Target) and select the rec.pdb file you just downloaded. | ** 4. Click on the first "Browse" button (to the right of Target) and select the rec.pdb file you just downloaded. | ||
** 5. In the next field "docked ligand" select the xtal-lig.mol2 file. | ** 5. In the next field "docked ligand" select the xtal-lig.mol2 file. | ||
** 6. Optionally, you may select the actives.smi and inactives.smi from the next two lines. | ** 6. Optionally, you may select the actives.smi and inactives.smi from the next two lines. [[Image:Tut1-2.jpg|thumb|right|Figure Tut1-2]] | ||
** 7. Enter your email address if you wish to receive progress reports by email. | ** 7. Enter your email address if you wish to receive progress reports by email. | ||
** 8. Enter a brief comment about the calculation | ** 8. Enter a brief comment about the calculation. | ||
** 9. (optional: enter cofactor.par below) | ** 9. (optional: enter cofactor.par below) | ||
If you have followed the steps above, your screen should now look something like Figure Tut1-1 (right). | If you have followed the steps above, your screen should now look something like Figure Tut1-1 (right). | ||
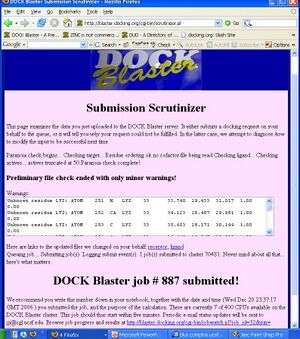
** 10. Click on "DOCK" to upload the files and begin docking. You will be taken to the "Submission Scrutinizer", as depicted in Figure Tut1-2. [[Image:Tut1- | ** 10. Click on "DOCK" to upload the files and begin docking. You will be taken to the "Submission Scrutinizer", as depicted in Figure Tut1-2. | ||
** 11. Your job should now be running. If it is not, there is either some part of the above instructions you did not follow, or we are currently experiencing problems with our systems. | |||
** 12. Read through the submission scrutinizer, and go to the Job Watcher by clicking on the link at the bottom of the page... http://blaster.docking.org/cgi-bin/jobwatch.pl?job_id=32&pin= | |||
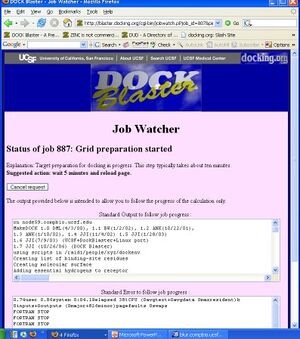
** 13. You should now be in the Job Watcher. Depending on how much time has elapsed, and how busy our cluster is, you will see a progress report of your job. It might look something like Figure Tut1-3. [[Image:Tut1-3.jpg|thumb|right|Figure Tut1-3]] | |||
** 14. If all goes well, the job will complete in about an hour. You may reload the page at anytime to get updated status of the job progress. | |||
** 15. Preliminary docking normally begins after the site preparation is complete, often about 15 minutes after you first submitted the job. Once preliminary docking results are available, new links appear in the job watcher to allow you to start to see docked ligands. Caution: until the preliminary docking is complete, it can be misleading to rely upon incomplete preliminary docking results to reach any conclusions about the docking results. | |||
Revision as of 23:47, 20 December 2006
DOCK Blaster Tutorials
1. DOCK MTX to DHFR (example of cofactor)
- 1. Go to DOCK Blaster web page blaster.docking.org. Please note that during pre-alpha testing this page is different. Contact John Irwin for details.
- 2. Click on "Start docking!" to go to the input preparation page.
- 3. Click on "HELP" to open up the documentation for input preparation in a separate window.
- 3.1. In the documentation window, click on "Sample Data" at the end of the first paragraph.
- 3.2 In the sample data window, click on the link to data.docking.org
- 3.3. Click on DUD40.
- 3.4. Click on CDK2.
- 3.5. Right mouse to save all five files in this directory on your disk.
- 3.6. Close the documentation window, returning to the DOCK Blaster input form.
- 4. Click on the first "Browse" button (to the right of Target) and select the rec.pdb file you just downloaded.
- 5. In the next field "docked ligand" select the xtal-lig.mol2 file.
- 6. Optionally, you may select the actives.smi and inactives.smi from the next two lines.
- 7. Enter your email address if you wish to receive progress reports by email.
- 8. Enter a brief comment about the calculation.
- 9. (optional: enter cofactor.par below)
If you have followed the steps above, your screen should now look something like Figure Tut1-1 (right).
- 10. Click on "DOCK" to upload the files and begin docking. You will be taken to the "Submission Scrutinizer", as depicted in Figure Tut1-2.
- 11. Your job should now be running. If it is not, there is either some part of the above instructions you did not follow, or we are currently experiencing problems with our systems.
- 12. Read through the submission scrutinizer, and go to the Job Watcher by clicking on the link at the bottom of the page... http://blaster.docking.org/cgi-bin/jobwatch.pl?job_id=32&pin=
- 13. You should now be in the Job Watcher. Depending on how much time has elapsed, and how busy our cluster is, you will see a progress report of your job. It might look something like Figure Tut1-3.
- 14. If all goes well, the job will complete in about an hour. You may reload the page at anytime to get updated status of the job progress.
- 15. Preliminary docking normally begins after the site preparation is complete, often about 15 minutes after you first submitted the job. Once preliminary docking results are available, new links appear in the job watcher to allow you to start to see docked ligands. Caution: until the preliminary docking is complete, it can be misleading to rely upon incomplete preliminary docking results to reach any conclusions about the docking results.


