How to create a vpn/ssh tunnel: Difference between revisions
| (29 intermediate revisions by 6 users not shown) | |||
| Line 1: | Line 1: | ||
= | = Generating an SSH key = | ||
First, copy this command into your terminal to start generating a new ssh key. | |||
ssh-keygen -t rsa | |||
It will then request you to specify a location. | |||
Enter file in which to save the key (/Users/user/.ssh/id_rsa): <input optional pathway here> | |||
If you do not insert a path, it will instead default to the location specified (default ie: /Users/user/.ssh/id_rsa). If you already have a key made, then it will ask you whenever you want to overwrite it or not. If you are using that key for something else, then make the new one at a different path location. | |||
Lastly, it will ask you for a passphrase, which is optional. | |||
Enter passphrase (empty for no passphrase): <input optional passphrase here> | |||
Your public ssh key can be found in the location where you specified earlier inside a hidden folder (default ie: /Users/user/.ssh/bkslab_key.pub) | |||
Send it to the person who creates your account, so they can add it into portal. | |||
= Direct Connection = | |||
=== Remote Connection === | |||
'''portal3 is just the lobby, there is nothing there. Inside portal3, you have to open doors to gimel OR epyc OR gimel2''' | |||
<source> ssh <username>@portal3.compbio.ucsf.edu </source> | |||
THEN | |||
<source> ssh <username>@<epyc OR gimel OR gimel2> </source> | |||
=== Local Connection === | |||
<source> ssh <username>@gimel.compbio.ucsf.edu </source> | |||
= Making a portal and tunnel = | |||
=== Linux/MacOS === | |||
First, open two terminals. In the first terminal, type the following: | |||
ssh <options/flags> localhost:2222:epyc2:22 -D1080 portal3.ucsf.bkslab.org -l <username> | |||
Example: | |||
ssh -vCL localhost:2222:epyc2:22 -D1080 portal3.ucsf.bkslab.org -l jjg | |||
This terminal will act as your 'portal'. You can't do much with the portal until you make a tunnel. | |||
In the second terminal, type: | |||
ssh -oHostKeyAlgorithms=+ssh-rsa -p 2222 <username>@localhost | |||
Example: | |||
ssh -oHostKeyAlgorithms=+ssh-rsa -p 2222 jj@localhost | |||
This should create a tunnel. To see if you logged in, try running the command 'hostname'. If it's successful, then you are in! | |||
___ | |||
Here's another example, say ''you want to scp files directly from your laptop to your home directory on gimel.'' | |||
First open two terminals. In one terminal type the following: | |||
ssh <options/flags> localhost:2222:epyc2:22 -D1080 portal3.ucsf.bkslab.org -l <username> | |||
ssh -vCL localhost:2222:epyc2:22 -D1080 portal3.ucsf.bkslab.org -l jjg | |||
In the other terminal type: | |||
scp -P 2222 file_you_want_to_copy <username>@localhost:~ | |||
=== Troubleshooting for Mac === | |||
If you see this error: | |||
Unable to negotiate with 169.230.26.166 port 22: no matching host key type found. Their offer: ssh-rsa,ssh-dss | |||
Solutions: | |||
Option 1: | |||
Add '-oHostKeyAlgorithms=+ssh-rsa' flag in your ssh/scp command | |||
Option 2: | |||
vim ~/.ssh/config | |||
Edit config file with the correct values | |||
Host <hostname> | |||
HostName <hostname> | |||
Port <your_port> | |||
User <username> | |||
ServerAliveInterval 100 | |||
HostKeyAlgorithms +ssh-rsa | |||
PubkeyAcceptedKeyTypes +ssh-rsa | |||
=== Windows OS === | |||
= | |||
Open putty.exe and select the session that you want to use as a ssh tunnel (ie portal.uoft.bkslab.org). | Open putty.exe and select the session that you want to use as a ssh tunnel (ie portal.uoft.bkslab.org). | ||
Latest revision as of 21:03, 5 May 2025
Generating an SSH key
First, copy this command into your terminal to start generating a new ssh key.
ssh-keygen -t rsa
It will then request you to specify a location.
Enter file in which to save the key (/Users/user/.ssh/id_rsa): <input optional pathway here>
If you do not insert a path, it will instead default to the location specified (default ie: /Users/user/.ssh/id_rsa). If you already have a key made, then it will ask you whenever you want to overwrite it or not. If you are using that key for something else, then make the new one at a different path location. Lastly, it will ask you for a passphrase, which is optional.
Enter passphrase (empty for no passphrase): <input optional passphrase here>
Your public ssh key can be found in the location where you specified earlier inside a hidden folder (default ie: /Users/user/.ssh/bkslab_key.pub) Send it to the person who creates your account, so they can add it into portal.
Direct Connection
Remote Connection
portal3 is just the lobby, there is nothing there. Inside portal3, you have to open doors to gimel OR epyc OR gimel2
ssh <username>@portal3.compbio.ucsf.eduTHEN
ssh <username>@<epyc OR gimel OR gimel2>Local Connection
ssh <username>@gimel.compbio.ucsf.eduMaking a portal and tunnel
Linux/MacOS
First, open two terminals. In the first terminal, type the following:
ssh <options/flags> localhost:2222:epyc2:22 -D1080 portal3.ucsf.bkslab.org -l <username>
Example:
ssh -vCL localhost:2222:epyc2:22 -D1080 portal3.ucsf.bkslab.org -l jjg
This terminal will act as your 'portal'. You can't do much with the portal until you make a tunnel.
In the second terminal, type:
ssh -oHostKeyAlgorithms=+ssh-rsa -p 2222 <username>@localhost
Example:
ssh -oHostKeyAlgorithms=+ssh-rsa -p 2222 jj@localhost
This should create a tunnel. To see if you logged in, try running the command 'hostname'. If it's successful, then you are in!
___
Here's another example, say you want to scp files directly from your laptop to your home directory on gimel.
First open two terminals. In one terminal type the following:
ssh <options/flags> localhost:2222:epyc2:22 -D1080 portal3.ucsf.bkslab.org -l <username>
ssh -vCL localhost:2222:epyc2:22 -D1080 portal3.ucsf.bkslab.org -l jjg
In the other terminal type:
scp -P 2222 file_you_want_to_copy <username>@localhost:~
Troubleshooting for Mac
If you see this error:
Unable to negotiate with 169.230.26.166 port 22: no matching host key type found. Their offer: ssh-rsa,ssh-dss
Solutions:
Option 1:
Add '-oHostKeyAlgorithms=+ssh-rsa' flag in your ssh/scp command
Option 2:
vim ~/.ssh/config
Edit config file with the correct values
Host <hostname>
 HostName <hostname>
 Port <your_port>
 User <username>
 ServerAliveInterval 100
 HostKeyAlgorithms +ssh-rsa
 PubkeyAcceptedKeyTypes +ssh-rsa
Windows OS
Open putty.exe and select the session that you want to use as a ssh tunnel (ie portal.uoft.bkslab.org).
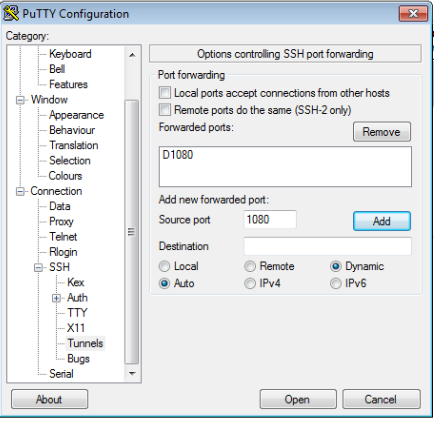
Then click on Connection -> SSH -> tunnels
In Source Port enter 1080 (or any port above 1024).
Then click the Dynamic button and then click Add.
It should look like this:
Then go back to Session and click Save.
Then download the "standard" version of FoxyProxy here: http://getfoxyproxy.org/downloads.html
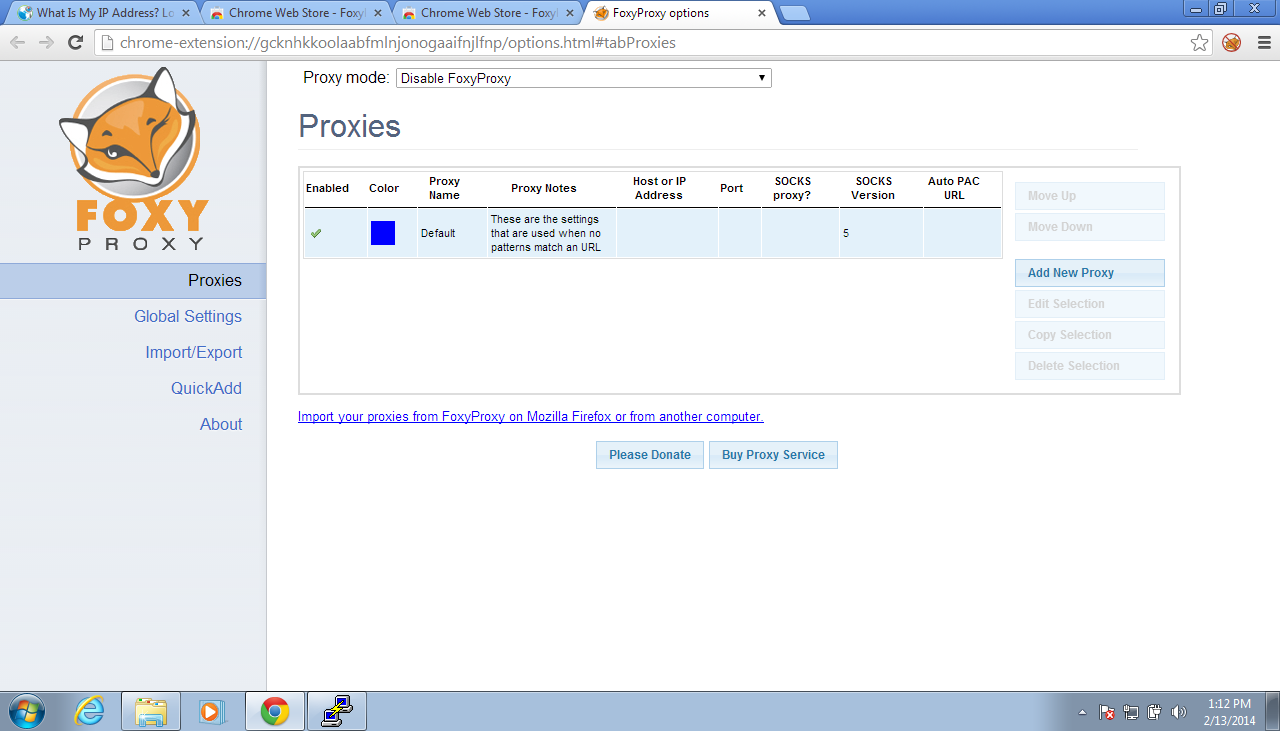
Once you’ve downloaded it there should be a little fox picture next to the url bar (upper right hand corner of web browser). Click on that little picture and select Options from the dropdown list.
You should see this:
Click on Add New Proxy
Then click on the General tab.
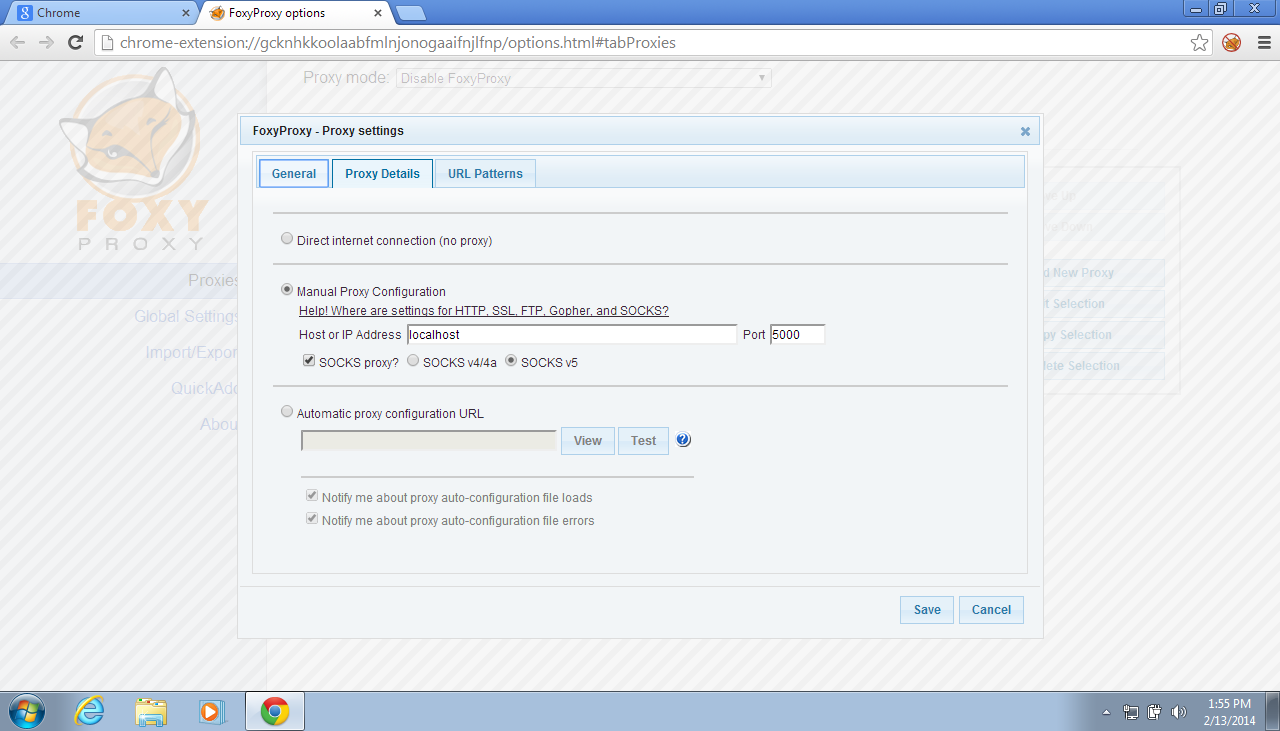
Enter a proxy name and then select the Proxy Details tab.
Enter “localhost” in “Host or IP Address” and 1080 for “Port” (or whatever port number you entered in putty).
Click the “SOCKS proxy?” Button and make sure the “SOCKS v5” button is also clicked.
Your screen should look like this:
Then click Save.
Then click on the fox again on the upper right hand corner and click on “Us proxy whatever_you_named_it Proxy for all URLs”
Then click on putty and open your session. A terminal will pop up and ask for your passphrase. Enter your passphrase (for your ssh key). That’s it!
To test if your tunnel is good, go to: http://whatismyipaddress.com/
This will tell you what ip address you have. If it says the IP address of the remote host you're connecting to in putty, you are good to go! :)
This session will remain open as long as your ssh putty session is open.
To scp files in Windows through this ssh tunnel, download WinSCP here: http://winscp.net/download/winscp551setup.exe
Once it finishes downloading, run it and go through all the prompts. You can (if you want) to import all your existing sessions from putty, but it’s really not necessary.
Once it’s done, open it.
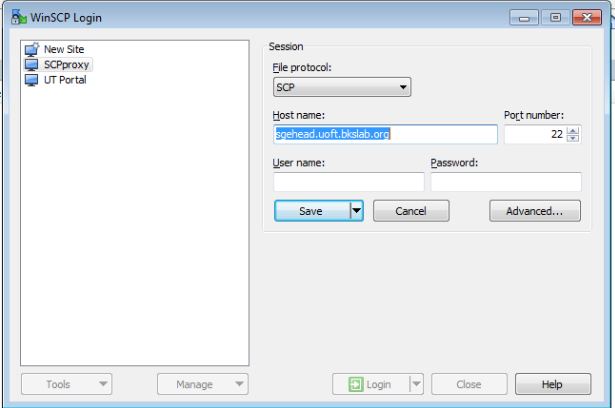
Click on “New Site”.
Then, in the File protocol drop down menu, select SCP.
In Host name, put the host name or IP address of the machine you want to transfer files to.
Keep the port number as 22. It should look something like this:
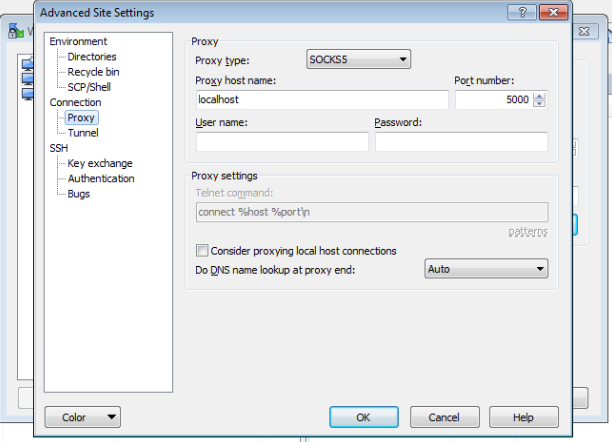
Then click on Advanced -> Connection -> Proxy
Click on the “Proxy type” drop down menu and select SOCKS5.
For “Proxy host name” write localhost. Make the port number 1080 (or whatever port you chose to use in putty).
it should look like this:
Click OK, then Save.
It will prompt you to enter a name, call it whatever makes sense to you.
Assuming that your putty session is still open, click Login.
It should prompt you to enter your username and password in the bottom.
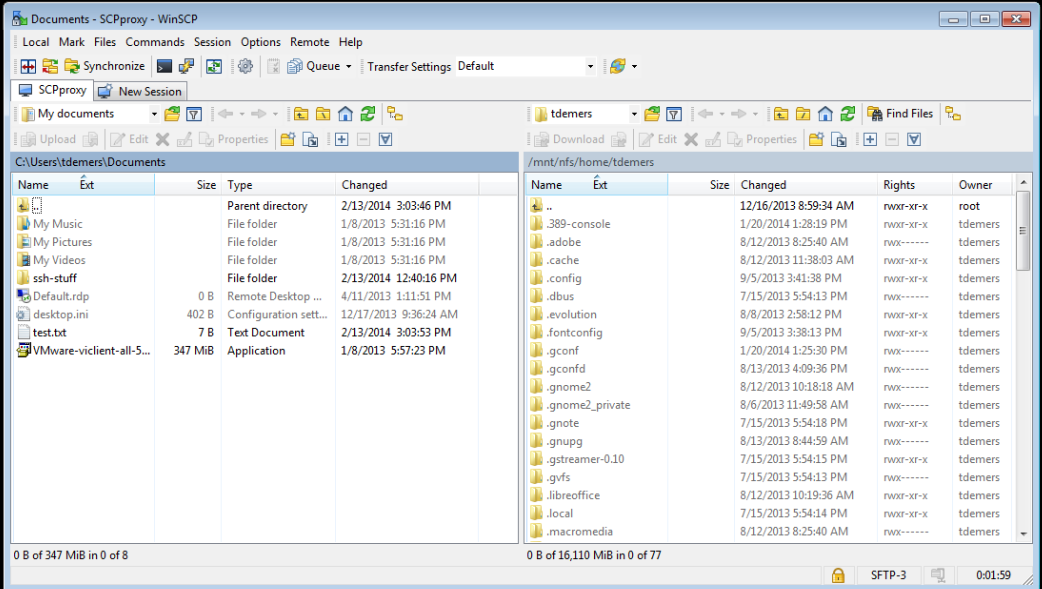
You should then see a screen that looks like this:
To transfer files from one to the other, select the file that you want to transfer and then click “Upload” to transfer files to the server and then specify which folder you want to save it to. If you are downloading files from the server to your computer, click the file you want to download and then click “Download” and specify where you want to download it to.
To exit, click on session -> disconnect
When you are done with your vpn session, exit from the ssh putty session (type exit on the terminal screen).
Then, on your browser, click on the little fox in the upper right hand corner and select “Disable FoxyProxy”.
