How to generate ssh keys securely: Difference between revisions
No edit summary |
|||
| (5 intermediate revisions by 2 users not shown) | |||
| Line 1: | Line 1: | ||
For all the following examples ''you'' is the user’s name that needs the ssh key and anything italicized is an example or comment (just in case you get confused). | |||
== For LINUX/MAC OS == | == For LINUX/MAC OS == | ||
On the machine that you will be '''sshing from''' (ie. your laptop/desktop at home): | On the machine that you will be '''sshing from''' (ie. your laptop/desktop at home): | ||
ssh-keygen | |||
ssh-keygen | |||
Enter file in which to save the key (/Users/''you''/.ssh/id_rsa): ''hit enter or specify a different directory'' | Enter file in which to save the key (/Users/''you''/.ssh/id_rsa): ''hit enter or specify a different directory'' | ||
| Line 24: | Line 19: | ||
…….some random “picture”……. | …….some random “picture”……. | ||
scp id_rsa_secret.pub ''you''@''remote_host'':~/.ssh/ | |||
scp id_rsa_secret.pub ''you''@''remote_host'':~/.ssh/ | Note, if there is an obscure ssh port (like 97) then you would use: | ||
scp -P 97 id_rsa_secret.pub ''you''@''remote_host'':~/.ssh/ | |||
scp -P 97 id_rsa_secret.pub ''you''@''remote_host'':~/.ssh/ | |||
On the remote machine that you will be '''sshing to''': | On the remote machine that you will be '''sshing to''': | ||
cd /home/''you''/.ssh | |||
cd /home/''you''/.ssh | cat id_rsa_secret.pub >> authorized_keys | ||
rm id_rsa_secret.pub | |||
cat id_rsa_secret.pub >> authorized_keys | chmod 700 /home/''you''/.ssh | ||
chmod 600 /home/''you''/.ssh/authorized_keys | |||
rm id_rsa_secret.pub | |||
chmod 700 /home/''you''/.ssh | |||
chmod 600 /home/''you''/.ssh/authorized_keys | |||
Then, back on the machine that you will '''be sshing from''': | Then, back on the machine that you will '''be sshing from''': | ||
ssh ''remote_host'' -l ''you'' | |||
ssh ''remote_host'' -l ''you'' | |||
OR | OR | ||
ssh -p 97 ''remote_host'' -l ''you'' | |||
You will then be prompted to enter your passphrase for the key, which will be the password you used when you used ssh-keygen. Then, exit and ssh in again and you’ll see it worked! You should not be prompted for a password again. :) | |||
Users must be added to the portal group on LDAP before they can successfully ssh to portal.ucsf.bkslab.org. | |||
If you encounter any problems with ssh'ing, use verbose output with ssh -v to view the error messages. | |||
== FOR WINDOWS OS == | == FOR WINDOWS OS == | ||
On the machine that you will be '''sshing from''' (ie. your laptop/desktop at home): | On the machine that you will be '''sshing from''' (ie. your laptop/desktop at home): | ||
| Line 75: | Line 52: | ||
Double click on puttygen.exe. Make sure in the parameters box on the bottom that “SSH-2 RSA” is selected and that the number of bits is at least 2048. It should look something like this: | Double click on puttygen.exe. Make sure in the parameters box on the bottom that “SSH-2 RSA” is selected and that the number of bits is at least 2048. It should look something like this: | ||
[[File:puttyKey1.png]] | [[File:puttyKey1.png]] | ||
Then click Generate and start moving your mouse around the blank area of the box until the green bar stops moving across. You should see something like this: | Then click Generate and start moving your mouse around the blank area of the box until the green bar stops moving across. You should see something like this: | ||
[[File:puttyKey2.png]] | [[File:puttyKey2.png]] | ||
You can change the “Key comment” to whatever you want. | You can change the “Key comment” to whatever you want. | ||
| Line 93: | Line 66: | ||
'''Do not click the “save public key”''' button, it saves it in a format that is not readable on any linux/unix machines. | '''Do not click the “save public key”''' button, it saves it in a format that is not readable on any linux/unix machines. | ||
Instead,select everything in the section “Public key for pasting into OpenSSH authorized_keys file”, right click and copy. | |||
Instead, select everything in the section “Public key for pasting into OpenSSH authorized_keys file”, right click and copy. | |||
Then go to the ssh-stuff folder and right click and select New -> Text Document. | Then go to the ssh-stuff folder and right click and select New -> Text Document. | ||
Name it something like sshkey.pub. Open it, right click -> paste -> save -> exit. | Name it something like sshkey.pub. Open it, right click -> paste -> save -> exit. | ||
Then scp the public key to the remote machine you will be sshing to. | Then scp the public key to the remote machine you will be sshing to. | ||
On the remote machine that you will be '''sshing to:''' | On the remote machine that you will be '''sshing to:''' | ||
su - | su - | ||
cd /home/you/.ssh | |||
cd /home/you/.ssh | cat id_rsa_secret.pub >> authorized_keys | ||
rm id_rsa_secret.pub | |||
cat id_rsa_secret.pub >> authorized_keys | chmod 700 /home/you/.ssh | ||
chmod 600 /home/you/.ssh/authorized_keys | |||
rm id_rsa_secret.pub | chown you:you /home/you/.ssh/authorized_keys | ||
chown you:you /home/you/.ssh -> Just in case | |||
chmod 700 /home/you/.ssh | |||
chmod 600 /home/you/.ssh/authorized_keys | |||
chown you:you /home/you/.ssh/authorized_keys | |||
chown you:you /home/you/.ssh -> Just in case | |||
Note: Make sure that you is in the sshd_config file as an AllowedUser | Note: Make sure that you is in the sshd_config file as an AllowedUser | ||
exit | |||
exit | |||
Then, back on the machine that you will be '''sshing from:''' | Then, back on the machine that you will be '''sshing from:''' | ||
| Line 132: | Line 94: | ||
Type a host name (or ip address) and enter the port number. Then enter a name for your session (ie UT Portal) and click Save. It should look something like this: | Type a host name (or ip address) and enter the port number. Then enter a name for your session (ie UT Portal) and click Save. It should look something like this: | ||
[[File:putty1.png]] | [[File:putty1.png]] | ||
Then click on Connection -> SSH -> Auth | Then click on Connection -> SSH -> Auth | ||
Click on Browse and select your private key (the xxx.ppk file). It should look something like this: | Click on Browse and select your private key (the xxx.ppk file). It should look something like this: | ||
[[File:putty2.png]] | [[File:putty2.png]] | ||
Then go to Session again and click Save. | Then go to Session again and click Save. | ||
| Line 150: | Line 108: | ||
Then, exit and ssh in again and you’ll see it worked! :) | Then, exit and ssh in again and you’ll see it worked! :) | ||
[[Category:Tutorials]] | |||
[[Category:Internal]] | |||
Latest revision as of 17:45, 20 September 2016
For all the following examples you is the user’s name that needs the ssh key and anything italicized is an example or comment (just in case you get confused).
For LINUX/MAC OS
On the machine that you will be sshing from (ie. your laptop/desktop at home):
ssh-keygen
Enter file in which to save the key (/Users/you/.ssh/id_rsa): hit enter or specify a different directory
Enter passphrase (empty for no passphrase): Your very very difficult to hack password
Enter same passphrase again: Your very very difficult to hack password again
Your identification has been saved in /Users/you/.ssh/id_rsa_secret.
Your public key has been saved in /Users/you/.ssh/id_rsa_secret.pub.
The key's randomart image is:
…….some random “picture”…….
scp id_rsa_secret.pub you@remote_host:~/.ssh/
Note, if there is an obscure ssh port (like 97) then you would use:
scp -P 97 id_rsa_secret.pub you@remote_host:~/.ssh/
On the remote machine that you will be sshing to:
cd /home/you/.ssh
cat id_rsa_secret.pub >> authorized_keys
rm id_rsa_secret.pub
chmod 700 /home/you/.ssh
chmod 600 /home/you/.ssh/authorized_keys
Then, back on the machine that you will be sshing from:
ssh remote_host -l you
OR
ssh -p 97 remote_host -l you
You will then be prompted to enter your passphrase for the key, which will be the password you used when you used ssh-keygen. Then, exit and ssh in again and you’ll see it worked! You should not be prompted for a password again. :)
Users must be added to the portal group on LDAP before they can successfully ssh to portal.ucsf.bkslab.org.
If you encounter any problems with ssh'ing, use verbose output with ssh -v to view the error messages.
FOR WINDOWS OS
On the machine that you will be sshing from (ie. your laptop/desktop at home):
Create a folder “Putty” in Computer -> Local Disk (C:) -> Program Files
Create a folder “ssh-stuff” (or whatever name makes sense to you to store you ssh keys in) in Computer -> Local Disk (C:) -> Users -> your username -> My Documents
Then download PuTTy and PuTTygen here: http://www.chiark.greenend.org.uk/~sgtatham/putty/download.html
Just scroll towards the bottom of the page and click on “putty.exe” and click on puttygen.exe. These wil now be in your Downloads folder. Go to your Downloads folder and right click on putty.exe and puttygen.exe and select cut. Then go to the Putty folder you created in Program Files and paste them there.
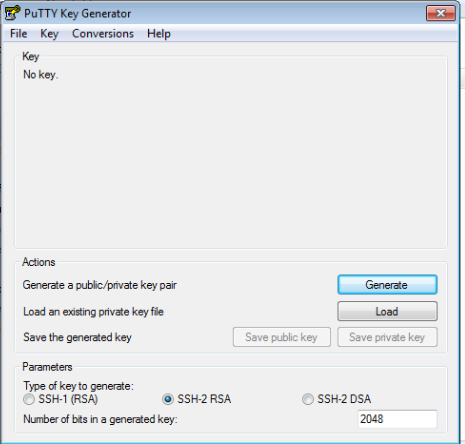
Double click on puttygen.exe. Make sure in the parameters box on the bottom that “SSH-2 RSA” is selected and that the number of bits is at least 2048. It should look something like this:
Then click Generate and start moving your mouse around the blank area of the box until the green bar stops moving across. You should see something like this:
You can change the “Key comment” to whatever you want.
Then enter a Key passphrase and Confirm the passphrase.
Then click “Save private key” and select the ssh-stuff folder you created and enter the filename as something like sshkey. Then click Save.
Do not click the “save public key” button, it saves it in a format that is not readable on any linux/unix machines.
Instead, select everything in the section “Public key for pasting into OpenSSH authorized_keys file”, right click and copy.
Then go to the ssh-stuff folder and right click and select New -> Text Document.
Name it something like sshkey.pub. Open it, right click -> paste -> save -> exit.
Then scp the public key to the remote machine you will be sshing to.
On the remote machine that you will be sshing to:
su -
cd /home/you/.ssh
cat id_rsa_secret.pub >> authorized_keys
rm id_rsa_secret.pub
chmod 700 /home/you/.ssh
chmod 600 /home/you/.ssh/authorized_keys
chown you:you /home/you/.ssh/authorized_keys
chown you:you /home/you/.ssh   ->  Just in case
Note: Make sure that you is in the sshd_config file as an AllowedUser
exit
Then, back on the machine that you will be sshing from:
Double click on putty.exe
Select Session.
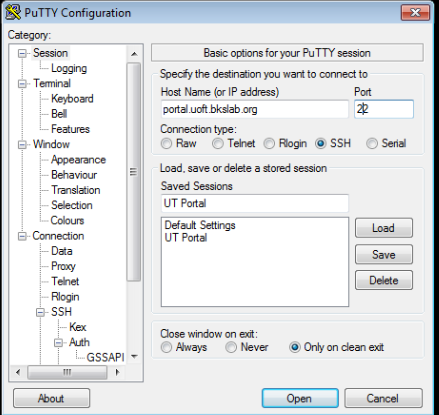
Type a host name (or ip address) and enter the port number. Then enter a name for your session (ie UT Portal) and click Save. It should look something like this:
Then click on Connection -> SSH -> Auth
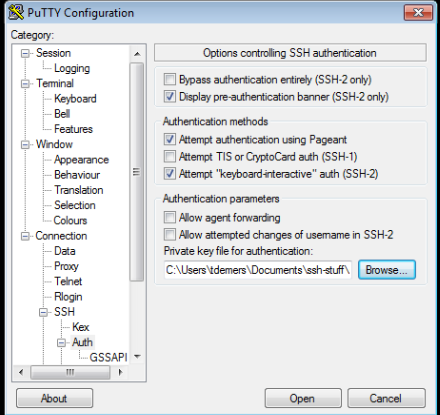
Click on Browse and select your private key (the xxx.ppk file). It should look something like this:
Then go to Session again and click Save.
Then click open and a terminal should pop up asking you for a passphrase. Enter the same passphrase that you used when creating your keys.
Then, exit and ssh in again and you’ll see it worked! :)


