FEP+ for GPCR
2/25/2021 Ying Yang 3/08/2021 Chase Webb
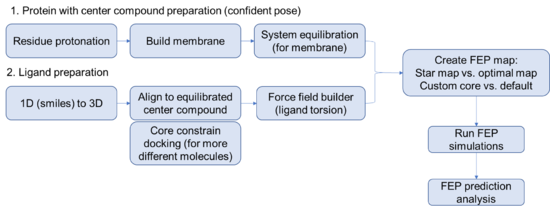
Steps for setting up a FEP prediction for membrane protein
Protein side
- Its always good practice to specify a relevant working directory and save the project. Maestro is prone to crashing randomly, especially when remotely accessing the license. Wouldn't want to lose all of your hard work.
- Begin by importing the structure of interest with a ligand that you are confident about. (FEP works best with an experimentally determined structure but can work with a docked pose if you are careful).
- Run the protein preparation wizard on your protein. Think carefully about protonation, you might even consider using the interactive protonation function to optimize the protonation state of the binding site residues or allosteric control points manually.
Protein model completeness Protein preparation should include fixing any chain breaks, modeling in any loop conformations and adding any missing side chains. Chain breaks near the active site will likely lead to poor results. Disulfide bridges should be created and termini residues capped where applicable.
Equilibration of complex structure (with confident binding pose)
- Build membrane using the System Builder tool. Use residue information obtained from OPM database (https://opm.phar.umich.edu/), add salts, add solvent. Default settings work well for most situations.
res.num 76-97,112-136,141,143,146-171,194-215,227-229,231-256,323-345,347,360-380,382,398
- Use the Molecular Dynamics tool to write out a simulation file to run on the cluster. Load the system you built in the previous step from the workspace. Specify a simulation time, for high confidence complexes, 20 ns should suffice. For more exploratory complexes and to assess stability of the ligand extend to 50-100 ns. Use the default Schrodinger protocol to relax the model system before starting the production run of the simulation. For ease of evaluation, you can check the box to output interaction analysis at the completion of the job. Instead of clicking run, click the gear to the left of the run button and write the file out to the disk.
- Replace the gimel-biggpu in the written out simulation job with the correct gpu location, gimel5.heavygpu then transfer (scp) the simulation job to gimel2, and submit
 sed -i 's/gimel-biggpu/gimel5.heavygpu/g' desmond_md_job_1.sh
 bash desmond_md_job_1.sh
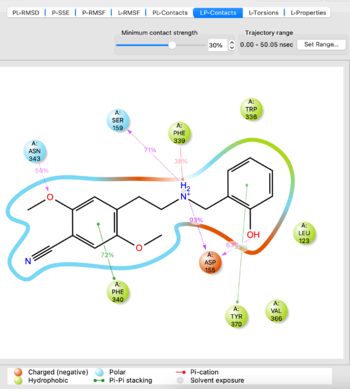
- Analyze the MD simulation using the Simulation Interactions Diagram tool from the TASKS menu. Import the -out.cms file from the simulation to analyze, it takes 5-10 minutes to load. If you are satisfied with the simulation as evidenced by things such as stability of protein/ligand, proceed. If not, potentially try another docked pose or run the simulation for a longer time.
Visualize the trajectory and analyze the simulation with SID tool
- Use the schrodinger command line tools to convert the last frame of the simulation -out.cms into .mae file.
$SCHRODINGER/run membrane_cms2fep.py -ligand 'ligand' 2A_NBOH_MD-out.cms -o relax_2A_NBOH_pv.mae
You have now prepared the receptor and the initial state for an FEP+ map. Marvel at your accomplishments.
Useful Schrodinger Commands
- Kill a submitted or running job:
$SCHRODINGER/jobcontrol -kill <jobID>
Ligand side
Careful preparation of the ligands is critical to a successful FEP+ prediction. Best practices include running LigPrep on all the compounds to exhaustively enumerate all the stereoisomers and likely protonation states of the ligands. Note that basic tertiary amines cannot invert their stereogenic centers during the simulation, making it important to model both protomers.
- Import the ligands into the workspace, recommend that you import smiles or a mol2 file. Use the LigPrep tool to build the ligands into a 3D dockable format. Consider generating a good amount of stereoisomers if you are unsure about the sterochemistry or you only have relative stereochemical information. Generate the relevant protomers at the relevant pH.
- Build a grid for docking from the .mae file you generated above using the Receptor Grid Generation tool.
- Simultaneously as above, use Force field builder to add potential energy functions for torsions that are missing from the Schrodinger catalog but present in your ligands. This is a time consuming step so do this as soon as you know which ligands you want to run FEP on.
Run force field builder for all ligands
- Flexible ligand alignment OR core constrain docking [when in doubt, always just do core constrained docking]
Depends on how similar/different are the ligands to the reference/center ligand
- Create FEP maps
- Write out the submission file; change host; submit on gimel2 via slurm

